Thursday, October 23, 2014

Tah - Lego block for Internet of Things


TAH Main Board
In this blog post I am going to introduce the Tah platform and talk about some of the applications using it.

Tah is a hardware as well as a software platform.  The hardware has following characteristics
  1. An Arduino with Bluetooth Low Energy (BLE)
  2. Onboard USB (HID device) - emulating a keyboard and a mouse
  3. Great building block (like a LEGO) for your home automation systems using Arduino.

USB HID-Compatible
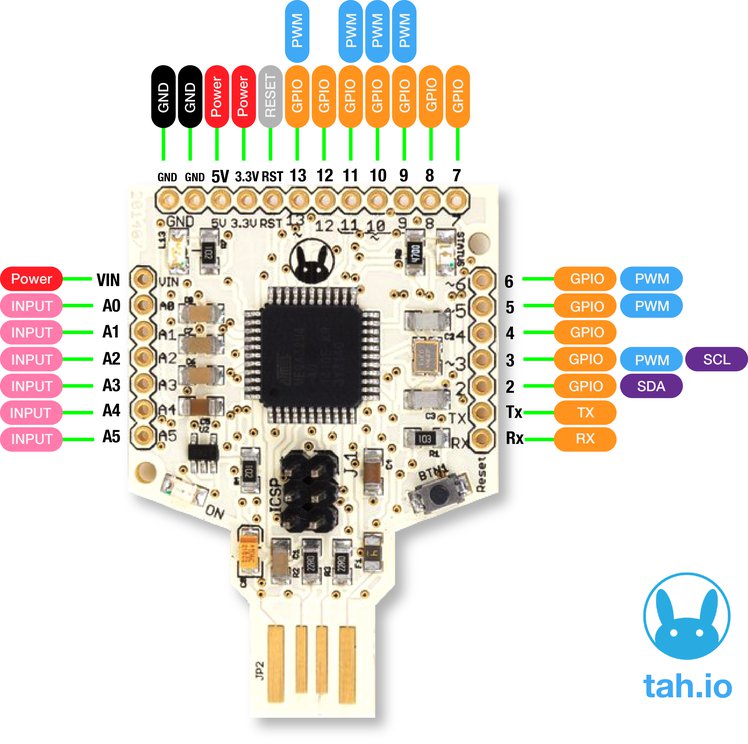
ATmega32u4 — the microcontroller at the heart of Tah — has onboard USB 2.0 support, that is used to directly program the Tah without having to use a USB-to-Serial converter. Tah can also act as a USB human interface device (HID), which enables you to create your own keyboard, mouse, joystick, or other input devices, all without the need for installing special software on the host computer. If you want to create a new smarter custom keyboard that communicates with your smartphone, you need not look beyond the Tah. It already has sample applications that allow you to control your PC, Mac, Linux, PlayStation and Xbox without ever needing to write any code for those platforms — all you need to do is program your Tah board and make a smartphone app, for which we’ve also provided open source examples for both iOS and Android to get you started.

Bluetooth Beacon

Each Tah board can serve as a Bluetooth beacon which tells your smartphone where exactly it is located based on the beacon’s unique identifier. This is amazing for indoor navigation, contextual notifications, and microlocalization.


Here are some of the interesting applications that can be built using the Tah and its shields.

Infrared Control (IR Transceiver Shield)

IR has been used for near range wireless communication for a long time. We have TVs, music systems, air conditioners and so many other things that have their own remote control  
We have created an IR shield which has a transmitter as well as a receiver on board. With this connected to your Tah, you have a universal remote that can be controlled from your smartphone. Forget keeping a bunch of remotes to control everything in your living room. You could do all of that from a single app on your phone. 

Relays (Relays + Sensors Shield)

Electronics is usually associated with low voltage DC appliances but so much of what we use everyday runs on 110V/220V AC. All our light bulbs, fans and everything else.  
To control these there is a Relay shield that translates signals between DC and AC so to speak. One can use the GPIO pins 2 and 3 from the Tah to control 2 relays. 
Bridge the gap between electronics and electrical with this relay plus sensor shield. It comes with its own app which you can use with some standard sensors such as the depth and temperature sensors among others.
  • Input working voltage: 7V to 12V DC
  • Two Relays rated 5V DC.
  • Load Capacity: 10A/120VAC, 10A/24VDC, 7A/250VAC
  • Relays are connected to Pin number 2 and 3 of Tah
  • Digital Pin Numbers 4 to 13 & Analog Pin Numbers A0 to A5 all are connected to 3 pin standard Grove connector

Arduino

That's why we have the Shield Shield which consists of the Arduino UNO R3 layout which let's you use the already available shields in their projects. This shield makes Tah compatible with all existing Arduino Shields, It means all your Arduino-compatible shields are also compatible with the Tah. (Input working voltage: 7V to 12V DC)

---
By no means is the above list comprehensive. There are many more amazing things that can be built using the Tah.  


Examples on the website. A forum to discuss more about this.

If you would like this device, you can grab them here.

(This is a product of Reavealing Hour Creations who run this blog and the IOT Community)


Thursday, July 31, 2014

Stellaris_ert

For someone who has loved C since he first started coding and still does, watching everyone else type away in his favorite language while his sorry ass has to deal with Matlab is a bit too much, call me sick but i am more attached to this primitive high level language than my own mother tounge.

For a year it went on, Matlab never failed to amaze me, but it never appealed to me as a choice of tool that i prefer, being a OpenSource hippie has its own disadvantages. I have worked on Matlab before, but those were sad days, when the night was dark and full of terrors, I myself prefered the staying away from something that wont reveal its true self, but now i had to work with it.

One fine morning in march 2014 i happened to search some gibberish on Google and happened to strike against this project by "Kyak" on github. I do not even know his real name or his gender, but the work he did did impress me..

I loved working with the hardware, but thrown into this abstract mess of interfaces that changed with every release cycle to the Customer meant, i can never really expect some surety in my software and bugs were bound to be present.

enough gibberish.. now, This project here deals with embedded coder and simulink coder, for those who do not know what this is...

It is a tool that converts graphical models to professional grade C code. sounds too good? yes it is.. considering the huge license fee.. its totally worth it for huge organization and there are so many of them.

This guy has made some set of scripts that create the blocksets needed to communicate with the Stellaris Launchpad from Texas Instruments, and all this can be done inside matalb, so stop worrying about the hardware issues, code away your idea, the rest will fall into its place.

Will come up with more things on this project after providing my contributuion to the same.

Do check this project out...

https://github.com/kyak/stellaris_ert

Thursday, July 3, 2014

Turning On and OFF syntax highlighting in VI

we all have our own preferred  way of writing code, most of the developers prefer an IDE while there are some who still love the classic terminal based editor like emacs or vi/vim.
I am of the latter kind and prefer vi over emacs (a personal choice btw.)
so how do you turn on and off the syntax highlighting in vi editor?
simple, go into the command mode by pressing esc and type the following


:syntax on
to turn on the syntax highlighting


:syntax off
to turn off syntax highlighting

Saturday, June 28, 2014

Changing Timeout in GRUB

This post specifically deals with configuring GRUB after a kernel has been built and installed on the UBUNTU 14.04.
The kernel images and System.map files are present in the /boot directory,  and the grub bootloader configuration loads the kernel image from there  only. The configuration settings of the grub bootloader are stored in the file /etc/default/grub

first of all you would notice that the
Selection_003

The configuration parameter GRUB_HIDDEN_TIMEOUT is set to 0, this somehow forces the bootloader to NOT show its selection menu.  we need to change that. just replace the zero with any value you want and then run the command
sudo update-grub
 
that's it... Reboot now and you will see the menu.

Wednesday, June 25, 2014

Hello Kernel

In this post we shall be writing a kernel module, which would cause the kernel to print our messages to the kernel log buffer. we shall not be looking deeper into the kernel buffer or the particular commands as that would be stretching this post too long. this is just a jump-start.

The kernel log is available through this command.
sudo dmesg
 
If you look at the messages already printed, they will be more often than not by the drivers , insert and remove a pen drive and run the command again, you will see some messages being printed. I would now advise to clear the kernel log buffer by running the following command.
sudo dmesg -c
 
now if you run the “dmesg” command again, you will see nothing or very minimal data s the old entries have been cleared and fresh entries are being put up.
let’s make the module now, do this task inside a directory you create, I named mine as “test” and the file as test.c. The contents of the file are as follows.

#include <linux/init.h>
#include <linux/module.h>

static int my_init(void){
printk("Hello world");
return 0;
}

static void my_exit(void){
printk("bye-bye");
}

module_init(my_init);
module_exit(my_exit);
 
now in the same directory make a file called Makefile and the contents of the makefile should be these.
obj-m := test.o
 
That’s it… now we run the command to compile our module. The command is as follows
make -C <linux-source-dir>  M=$PWD modules
 
if the compilation is succesful you will have a file named test.ko in the directory. we need to load it by using the insmod command.
sudo insmod test.ko
 
now see the kernel log by
dmesg
 
you would see the two messages “hello world” and “bye-bye”. It is finally done now, you have made the kernel print out a custom message for you.
There would have been many questions on the way but no worries all would be clear with some efforts. The strange make command, the new commands like “insmod” “dmesg” are real simple and can be understood with a simple google search. for the serious minds do read “Linux device drivers by greg kroah hartman” and “Linux kernel development by Robert love” the two very good books that i have always referred to. any more questions? do comment.. more than happy to help.

Kernel Programming Step 1

Hallo there, I hope that my last post on Yocto project would have helped you. Taking things forward, this blog post has its focus on the Linux kernel.

This post will emphasise on the First step to kernel programming.
 so what are the first steps?
simple... Build a kernel and install it.

and the i expect some Linux proficiency from the readers, if you have written a simple hello world program and compiled it in Linux terminal you are good to go.

if at this point you are still wondering what a kernel is ? or what does kernel programming means.. we shall do a quick, lightweight insight into these aspects... This is a different kind of task so if any issues , just post in comments, i will be glad to help.

1. Kernel is the core of the operating system that you use, it is NOT the GUI, it is not NOT the application it is a forever running program that calls other programs based on the request that you give.. Putting it in layman terms the Postal office does not write the letters for you, nor does it reads it for you it just takes your mail from you to your destination and it is not just the mail , it parcel, money orders and what not?  lets use this postal service example for rest of the blog tooo... :)

2. kernel programming is telling the kernel how to do something.. keep in mind that the kernel already has many things up in its armoury, we shall add some extra features or improvise the existing ones.. lets say faster delivery of mail or adding support for food delivery.

does the term kernel applies to Linux kernel only?
not necessarily, there is the Unix kernel (Linux is inspired from this) then there is the windows kernel (closed source) and many other operating systems for hardware small and big. however we shall be working on the Linux kernel only, because of the ease of access that is provided for everything.

how will this help me?
well, for starters you can add your own functionality to the OS which you wouldn’t have achieved before. you could also do some pretty nasty things, but that can wait.
Kernel programming do requires lots and lots of reading as things are much more based on policy than implementation. you are not the one deciding how the kernel should work (unlike the user application) instead you work using the existing features that are available in the kernel and do something new. if you still want to dictate things your way, you are always free to download the source and modify it in ways that you want, nobody is stopping you.. Open source baby !!

in one sentence I would say Kernel programming is like a elevated state of programming.

Here you have to follow the rules to get your work done. why so? because there is no backup, its like the last stage of a video game, you have to measure your steps, yes you will fall but you will succeed. just Hold on tight.
There might be some questions on the mind of those who are just getting started, but no issues as they will fade away once you start.

I am using Ubuntu 14.04 and had all the packages that I require before hand. to be sure
On fedora and other similar systems
$ sudo yum install gcc make git ctags ncurses-devel
 
on ubuntu and other similar systems
$ sudo apt-get install libncurses5-dev gcc make git exuberant-ctags


Step 1: Get the Kernel Source.
there are 2 ways to do this , one is to download a tar-ball from Kernel.org and the other one is to clone a stable git repo of the kernel. I used the latter method as it gives me all the available versions of the kernel source while the first one only gives a particular release.

I used the latest Long  term support version of the kernel, that is v3.12.22 you are free to use any version you want. Here I expect some proficiency with the Linux system like unpacking a tar-ball, copying and renaming files among other things.

if you want to clone the git repository just run the following command
$ git clone git://git.kernel.org/pub/scm/linux/kernel/git/stable/linux-stable.git

you will have the source in the directory called "linux-stable"
$  cd linux-stable
 
to look at the available versions
$ git tag -l | less
 
 to checkout your version use this 
$ git checkout -b stable tag
 
you will have a branch called "stable" and replace "tag" with "v3.12.22" or your required version.

for those who downloaded the tar-ball, Once you have downloaded the source, extract the tar-ball and you would have the Linux source, CD into the Linux source .
You should see some directories make sure ARCH, KERNEL and DRIVERS are there among others.

now you need a configuration for the build... these directories will remain same for those who have cloned the git repo too.
if this is complex, please do a google search, there are many resources out there for your help.

Step 2: Get a config file
now, as a begginer it is not advised to build your config, use the existing config that is available. your distribution will have its config in the /boot directory. my config file was called config-3.13.0-24-generic copy this into your linux source directory as .config. This filename is important, you have to name it .config.

any time you think that you have messed up the directory, just do a
$ make mrproper

this command should work, run it from the Linux source directory.
$ cp /boot/config-`uname -r`* .config
 
this should not pose a problem, run this command to make sure everything is fine, if you do not have a configuration file  run this command to build one for you
$ make defconfig
 
$ make oldconfig
to verify that all settings are fine.

now
Step 3: Build the kernel
$ make -jX
where X = number of cores *2 on your CPU. if not sure just
$ make
 
this might take lots of time and CPU resource and a lot of build messages would be printed on the screen during this time. while this is happening I would advice to read the first chapter of "Linux kernel in a nutshell" by greg kroah hartman, he is the maintainer of drivers for the Linux kernel.
after this is done only one command remains
$ sudo make modules_install install
  
you must this run as SUDO.
if you are on UBUNTU, do a
$ sudo update-grub
 
 so that grub knows about the new kernel.
If things are not going well till now, I know they wont do not fret, just post in comments I would be glad to help. Time to reboot now and in the grub menu, select the new kernel that you have created and installed.
Summary:

Step 1:
$ sudo apt-get install libncurses5-dev gcc make git exuberant-ctags
or
$ sudo yum install gcc make git ctags ncurses-devel

Step 2:
$ git clone git://git.kernel.org/pub/scm/linux/kernel/git/stable/linux-stable.git
$ cd linux-stable

Step 3:
$ git tag -l | less
$ git checkout -b stable tag

Step 4:
$ cp /boot/config-`uname -r`* .config 
or
$ make defconfig

Step 5:
$ make
$ make -jX

Step 6:
$ sudo make modules_install install

Step 7:
$ sudo update-grub2

Step 8:
$ sudo reboot

feel free to post any questions in the comment section, will be more than happy to help.


Thursday, June 12, 2014

Getting Started with Yocto Project Yocto-101

This blog is first in the series of blog that will follow in the Yocto Project series.
It will be my personal reference for the Yocto Project  that i am pursuing as my hobby. my aim would be to concentrate on the Bitbake, and Qemu parts, others will follow will follow.
so first step would be to visit the Yocto Project website and explore the blog, documentation and the smaller things there, just to get a feel of the project.
The main thing to remember about the project would be


Q What is Yocto Project ?
It is a set of scripts that are designed to produce a working Linux image.
The scripts are written using Bitbake which is a utility written in python. This is used for parsing the configuration settings that you have provide.
Its a Build appliance that works on the poky project to generate the images. I would advice not going too deep into these other collaborative projects as of now .
this picture here sums it up real good

we would however be concentrating on the following..
1. User Config
2. Metadata
3. Machine BSP
4. Image generation

Q What do i need ?
at-least 50GB of hard disk space... (100GB is what they say. i have never gone beyond 40) there are methods to conserve that too..
I would advice that you take a structured approach to the project. The fact that you are interested in yocto project, it is safe to assume that you have a Linux workstation. Ubuntu is preferred because of its support system, but other distros like OpenSuSE and Fedora are also supported, its your choice here as long as it is Linux. :)
create a Directory structure with Yocto being the parent directory, and create a subdirectory called downloads, sstate-cache  and BSP  inside it.. the reason would be clear as we progress, but this approach would save some efforts later on.
If you wish you can also create a separate Git repository if you want to share your scripts later on on github or other such methods.. its up to you..
so in my scheme i make the following directories...
Yocto
-------- downloads
-------- bsp
-------- Yocto-101 (my github repo)

I will be sharing all these scripts on my github page.. so you can always follow..
https://github.com/12mhz/Yocto-101
you can follow me here for my other projects here
https://github.com/ArunMKumar  (PS: i am just starting out :) ) or
in this first post we will BAKE our first recipe... tweak the basics in the most basic script and learn something about Bitbake.
so lets start...
first of all you would need the following packages on the Ubuntu system..
use this command... many of them would already be present out of the box

sudo apt-get install gawk wget git-core diffstat unzip texinfo gcc-multilib \ build-essential chrpath libsdl1.2-dev xterm

  
make sure you have python 2.6 or 2.7, python 3.x would NOT work here.
once you are done with this step... we need one more repository... basically the "Poky"
git clone http://git.yoctoproject.org/git/poky
These things will take time based on your internet speed... well the first round of build is known to take a hell lot of time if you have a slow internet connection, broadband is preferred...
as you would be doing this i would seriously advice you to join  the yocto project mailing list.. its really helpful. by the time these repos are being cloned you can have a look at the project website.  It has some serious contributors and associated brands that will show the nature of this project. This may not be as popular as the arduino project or others but it has its own type of followers.
now if you have the repositories at your disposal..
I would leave the discussion about Poky, Bitbake and other things for a later post as of right now our aim is to build a Linux image and boot it into qemu.
You  would now end up with a directory structure like this... very well done.


Selection_002// Ignore the build directory for now.


you now have to run the following commands... from within this directory. actually you can run this from any directory if you give the path correct. First decide where you want the Build directory to be present. it can be some other folder anywhere (i have not tried symbolic links).
The Build directory contains your local build specific scripts and this will contain your final image, Please note that all of this is still configurable, and if you wish you can have your resultant image be placed somewhere entirely off this directory, I would advice against it as of now... so let the structure of the build directory be intact. The directory structures are entirely the choice of user, as they prefer it.


How do i create the build directory?
I like my build directory in the parent directory and not inside poky. so first make sure that you are in the parent directory and poky, bsp, downloads ,sstate-cache are on the same level and run this command.


$ source poky/oe-init-build-env


you should see the following output.


### Shell environment set up for builds. ###
You can now run 'bitbake <target>'
Common targets are:
    core-image-minimal
    core-image-sato
    meta-toolchain
    adt-installer
    meta-ide-support

You can also run generated qemu images with a command like 'runqemu qemux86'

The reason for running this command is it sets up runtime variables that are necessary for the build process and are lost when you close the terminal, these wont be available on other terminal tabs too, they are specific to one session.
now you would see a directory named build here. Oops you are inside the build directory. :)
If you hate the name build just add the name to the end of the command


$ source poky/oe-init-build-env  <dir_name>

you would land inside that directory....
well look at the new directory structure....


Selection_004


we see a directory named conf. Lets go inside it...
we see a file named local.conf
before reading further, have a careful look at the file, your patience will be rewarded, the comments are self-explanatory and easy to grasp.
The variable TOPDIR is the path to your build directory  and everything else is taken relative to it.
we have to make some changes to it now...
find and modify DL_DIR


DL_DIR ?= "${TOPDIR}/../downloads"

why?
because we have created a download directory for ourselves, the reason being each build will download packages from the internet, and these are reusable and keeping all the downloads in one directory in top level helps sharing it among builds. if you download for each build you will finish your disk space sooner with redundant files which could have been shared, also not to mention the bandwidth usage, The first build will take time as it has t download lots of packages, the subsequent builds will be faster by this method.


The machine type is already set as default

MACHINE ??= "qemux86"

we shall have a look at the differences between ?= and ??= in the coming posts :)
You are good to go now, I would have made some changes regarding the Parallel jobs and number of threads, but the latest poky release manages that very well, so we can see that later.
coming back to the top level directory... run the following command
  
 $ bitbake -c fetchall core-image-minimal
  
This command guarantees that you will have all the packages before you wish to build, It will NOT start a build but would fetch the necessary packages. I prefer this because my INTERNET connection is not predictable :)
This can take a whole lot of time (in hours) depending upon your internet connection.
Once you have downloaded all the packages...
 

$ bitbake core-image-sato

  
This will build a image with GUI. This command can also take lots of time and CPU power.
Once this is finished.. .look inside the tmp directory inside the build directory.
you can see the following directory structure deploy->images->qemux86
within this directory you will have the image that was built.

come back to  the Parent directory that is build and run the following command


$ runqemu qemux86


Thats is you should now see the Image booting up a Qemu machine.
Selection_005
You should see something like this coming up on your screen.

This post has derived its content from numerous documentation from the Linux foundation and my experience of tinkering around on a Linux system, If something in the post is not working please mention it in the comments. I will be more than happy to help.. till then
HAPPY HACKING

Tuesday, June 10, 2014

Raspberry Pi Scoreboard

This is a simple project that  tries to use the Raspberry Pi as a Scoreboard.. on a character LCD
What we will do in this project is write a python script that will use httplib and rplcd to connect to the internet and display the score..
if you are not aware of Raspberry Pi or the Python programming language, there are plenty of resources on-line. I personally learned python from the python monk and learnpython
It is a matter of a few hours before you are well versed in both.
I was making a Cricket  scoreboard as part of the Google Hackathon, you can use the same method to do many other tasks, from facebook notifications to tweeter.
make sure that your RPi has a running OS and is connected to the INTERNET. refer to my  1 minute RPi setup blog post for instructions on the same
The Score:
      First of all i needed a web API provider who does it for free. (not easy to find).  google helped me here and i was lucky..
I found this somewhat immature API that gives out some basic scores at [embed]http://cricscore-api.appspot.com/[/embed]
please bear in mind that this was my first python program so i was happy that it worked, there may be some mistakes but it worked.
the way this works is I create a connection to the website and read the response.
Con = httplib.HTTPConnection('cricscore-api.appspot.com')
Con.request("GET", "/csa")
Response = Con.getresponse()
return eval(Response.read()) ## Disputed

and once the score was recorded i decode it according to the format that the API provided the result in. Now this part is highly API specific and would vary from API to API, so i do not think that it will be a great idea to go through that mess, as you would end up doing that all over again for your set of API.
Just remember that you have recorded the response and would have to act on it accordingly.
In my case i had to get the Match ID for my favorite teams, and then get the score string in the type i required (detailed or short) and then display it on to the LCD "periodically".


The LCD:
for using the LCD i used he RPLCD library.. its available on GITHUB [embed]https://github.com/dbrgn/RPLCD[/embed]
you can clone this library, follow the README  and install it using pip. (comment if facing any difficulties)
This command has to be run on your RPi, if you are facing difficulties connecting to your RPI , have a look at my 1 minute RPi setup blog post, that would seriously help.
 sudo pip install RPLCD

as for the connections of the character LCD on the Pi this is the schematic..
https://camo.githubusercontent.com/bac6cc4b14889f30203b049122e339a7cb385062/68747470733a2f2f7261772e6769746875622e636f6d2f646272676e2f52504c43442f6d61737465722f646f63732f776972696e672e706e67

connect the Vcc, Ground and other connections to the 5v and ground pins that are available on the GPIO. use the 3.3 v pin for connecting the LED pins. as you can see you are not out of pins here.
Setting up the layout of the display is finally your choice.
for a start you can use my script.
change the Favorite Teams list and add your cricket team , if there is a match on a particular day, it will show up.IMG_20140601_093036780
if you look at the display i have added Date and time display too.

here is the script (I would seriously advice against copying it from here, use the link)

# Python script to display the latest scores
# Arun Kumar @ArunMKumar
# Varun Gupta varun90gupta@gmail.com
# Anish Tambe @atdaemon
# 01.06.2014


######################## Libraries ##############################
from __future__ import print_function, division, absolute_import, unicode_literals
from RPLCD import *
import httplib
import time
import re


####################### Constatnts #############################

teams = ["England", "India", "Sri Lanka", "West Indies", "Punjab T", "Chennai T", "Yorkshire", "Hampshire", "Surrey", "Sussex" ]
rows = {"time" : 0 , "team1" : 1 , "team2" : 2 , "player" : 3}
colm = {"teamname": 0 ,"score": 12, "time": 11}
namelen = 7
###################### functions ##############################

display = None

def initLCD():
global display
display =CharLCD()
display.clear()
display.cursor_mode = CursorMode.blink


def getMatchList():
Con = httplib.HTTPConnection('cricscore-api.appspot.com')
Con.request("GET", "/csa")
Response = Con.getresponse()
return eval(Response.read()) ## Disputed

def getFavsIds(matchesList,favTeams) :
favs = []
for match in matchesList :
if match['t1'] in favTeams or match['t2'] in favTeams :
favs.append(match['id'])
return favs

def getMatchScore(matchId):
Con = httplib.HTTPConnection('cricscore-api.appspot.com')
Con.request("GET", "/csa?id="+"+".join(map(str,matchId)))
Response = Con.getresponse()
return eval(Response.read()) ## Disputed

def getTeamNameandScores(status):
Result = re.search("([a-zA-Z\ ]+).*([0-9]+\/[0-9]+)*[\ \*]*v([a-zA-Z\ ]+).*([0-9]+\/[0-9]+)*",status)
names = [Result.group(1), Result.group(2), Result.group(3), Result.group(4)]
return names

def displaytime():
global display
display.cursor_pos = (0,0)
Current_Time =time.strftime("%d %b %y")
display.write_string(Current_Time)
display.cursor_pos = (rows['time'], colm['time'])
Current_Time = time.strftime(" %H:%M:%S")
display.write_string(Current_Time)


###############################################################################


initLCD()

#Get list of matches
matches = getMatchList()


#Get the Match ID
matchIds = getFavsIds(matches, teams)


#get the status for all matches
statuses = getMatchScore(matchIds) # all scores
print(statuses)
# Display Scores

for status in statuses:

         nameAndScore = getTeamNameandScores(status['si'])

         display.clear()
         displaytime()

         if nameAndScore[0]:
         display.cursor_pos = (rows["team1"],colm['teamname'])
         display.write_string(nameAndScore[0].strip()[:namelen])

         if nameAndScore[1]:
                display.cursor_pos = (rows["team1"],colm['score'])
                display.write_string(nameAndScore[1].strip())

         if nameAndScore[2]:
                display.cursor_pos = (rows["team2"],colm['teamname'])
                display.write_string(nameAndScore[2].strip()[:namelen])


        if nameAndScore[3]:
                display.cursor_pos = (rows["team2"],colm['score'])
                display.write_string(nameAndScore[3].strip())

time.sleep(60/len(matchIds)) # sleep accordingly
Happy hacking.

Monday, May 19, 2014

The TivaC Series Launchpad : Getting Started


This is the second post from me at the internet of things pune.
and this time we are going to work on the TIVA C series launchpad Powered by a Cortex-M4 MCU.
as of now its the top end of the lineup of ARM-core based TI MCU.

This post entry is not meant to be a detailed introduction but is more of meant for the impatient.
I used the TI workshop links to get started, i have shared the links at the end of the post, feel free to go there for detailed information or scratch your way through the complex network of TI website.

first a little description about the board:
     The board was designed to be the arduino for TI. yes that's true, the whole design philosophy of a development environment that is low cost and supports booster-packs (read shields) and multiple development environment is a direct take on Arduino. 
This board has got
        80MHz TM4C123GH6PM microcontroller,
        on-board emulation and BoosterPack XL format expansion pins. 
        256KB of flash memory
        32KB of RAM
        2KB of EEPROM
        two 12-bit analog to digital converters
        a USB 2.0 OTG/H/D port
        a hibernation module
        motion control
        serial connectivity and flexible GPIO. 

well when we see these specs, the other such platforms are in some serious trouble.
These are only the tip of the iceberg, if you go deep its like John snow and khaleesi had a son on a Full moon night who happened to be brought up by Walter white and Sherlock.

coming back to the topic...

Hardware Requirement
        Laptop running Windows (sadly)
        Tiva C series Launchpad TM4C123GXL
        USB cable that came with the Kit, (android phone USB connecters would do)

i am working around a way to get it working on linux with Code-Sourcery. a post would follow for the same.

Software Requirements: 
        Code Composer Studio 5.4 and above.
        TIVA WARE
        LM Flash Programmer

IMP: In the License option when you start up, choose the Free License (not the MSP430 one) that is a different thing, will come in some other blog post.

Tiva ware is a collection of different utilities that are required to work on this platform in CCS. you can surely do it without the TIVA ware, but this definitely would make the job easier. No hassles with third party libraries and other things. These things would otherwise have taken much more time and since they are OS independent so feel free to tinker around with FreeRTOS or Micrium if you want with the same headers.

to download the TIVA WARE go to the link , Download the complete one.

Still confused by the TI layout (warned you !!)

go to this link
and click there (as in the Picture)
   
If you through here then very well done...

by now you should have been done with 

1. Download and installation of the COde COmposer Studio (v 5.4 and above)
2. Installed the LM Flash Programmer
3. Installed the TIVA ware

These are enough to get started with the most basic programs, others may be needed as we progress into the other toys in the armory.              

as for the ICDI drivers, on Windows 7 the drivers are installed automatically, so no issues should occur with that. If it still gives some issues.     


go to this link
and download the driver.
                    
Having done this , lets now configure the Code Composer Studio


The Projects  and the workspace settings are the same as in any other eclipse project setting.
One important thing to remember is that the Projects and the files in the workspace are only linked and are not actually present,
Deleting them would only delete the link and not delete the files from the disk.

SYS/BIOS is a Real time kernel from TI and includes ,and provides scheduling, memory management and instrumentation and has been optimized for TI devices and is fully compatible with TIVA ware.

The Linker uses the SYS/BIOS Command file for guidance,  the command file contains the list of all memories on the part and what type of  Software should be placed within them.

The WORKSPACE contains the projects and settings relevant to the IDE and other high level preferences for the development environment.

the PROJECT contains the build and tool settings along with the specific settings for the device and the target.

.ccxml  is the device configuration file.
.gel file is the startup file.

Programming with code composer requires an emulator, the Launchpad has an onboard emulator, for others we need to provide other.
these two files are used to initialize and load your software onto the target hardware.
When do you need Static Files and not Links ?

If working on a single machine the source files need not be copied among various projects and they may be linked and the project would build without any issues.
but if we want to share the project then we have to copy the files as the links might not be available on the different machines on which the project need to be built, 
thus copying the files would be a better solution. This would eliminate the problem altogether.
now we shall configure the environment variables.

If it is already too much for you, 
take a break or take a walk.. its your wish as the learning curve is much steep here, but the reward is set accordingly.
Step 1: Fire up CCS
you shall now be greeted with a very familiar desktop like this
 
Step2: Create new project.
please note that you have to create a new CCS project and not an eclipse project. 


after you create  a new project there are certain settings that have to be configured.


make sure the settings are correct as shown in the picture.

after this we CODE.

so finally all set up...

here is the code..

#include <stdint.h>
#include <stdbool.h>
#include "inc/hw_memmap.h"
#include "inc/hw_types.h"
#include "driverlib/sysctl.h"
#include "driverlib/gpio.h"
 

uint8_t ui8PinData=2;

int main(void)
{
        SysCtlClockSet(SYSCTL_SYSDIV_5|SYSCTL_USE_PLL|SYSCTL_XTAL_16MHZ|SYSCTL_OSC_MAIN);
        SysCtlPeripheralEnable(SYSCTL_PERIPH_GPIOF);
        GPIOPinTypeGPIOOutput(GPIO_PORTF_BASE, GPIO_PIN_1|GPIO_PIN_2|GPIO_PIN_3);
       

        while(1)
       {
              GPIOPinWrite(GPIO_PORTF_BASE, GPIO_PIN_1|GPIO_PIN_2|GPIO_PIN_3, ui8PinData);
              SysCtlDelay(2000000);
             GPIOPinWrite(GPIO_PORTF_BASE, GPIO_PIN_1|GPIO_PIN_2|GPIO_PIN_3, 0x00);
             SysCtlDelay(2000000);
             if(ui8PinData==8) {ui8PinData=2;} else {ui8PinData=ui8PinData*2;}
        }
          
        return 0;
}


well thats it...
if you look at the code closely you will see that the code is written to light up one LED at a time.
if you reduce the duration of the delay... the switch will be faster and at one point in time they will all mix up to form white color based on the duration of the delay you give.


you may see some error being shown at the Include commands, that is because you dont have the coorect Include paths,
Lets correct it

  In the Project settings go to Linked resources and add the variable "TIVAWARE_INSTALL"
the value being the install path of the libraries.In my case it was C:\ti\TivaWare_C_Series-2.1.0.12573  now include the same variable in your include paths  Only one step remaining now...that is including the library..right click on the project and add files  now add the library file, this will be present in the TivaWare directory..on my system the path was this ...C:\ti\TivaWare_C_Series-2.1.0.12573\driverlib\ccs\Debug add the driverlib.lib file present there... Add the file as a Link and change the relative Link variable to the TIVAWARE_INSTALL we will not get into the details about the Copy or Link files... let the settings be at this point..thats all...now build the project by clicking on the Hammer sign  and then start the debug session with the.. once the debug session is ready.. just start it with the Play button.The Leds should blink one by one now... Please note that if you dont have the LEDs blinking.. its my humble request that do not give up... you are on a right track.. a little tweak here and there would fix the issue. you may also see some warning regarding the stack, this may be ignored safely.This post does not cover many things like the Clock systems in Tiva C series, and the initialization etc.the GPIO itself is complex compared to other MCUs in the hobby category..but keep calm and code.. your patience will be rewarded in here..as i mentioned before this thing is a monster compared to arduino and AVR.. but  a monster does not gives up easily...so you can either tame the monster or go back to killing flies. its your wish..for resolution of errors and other info, the TI e2e community is an awesome resource, filled with community member and TI employees ready to help you 24X7.any more issues, please do comment, i am more than willing to help. Dont stop here, keep exploring the TIVAWARE directory on your system, you will find the pleothra of resources that TI has provided at your disposal. The support ecosystem is very good.read the Data sheet, visit the wiki pages for the launchpad, read the application notes and Keep Coding.. Happy hacking..